Hello Everyone,
It has been a while! As always, school and work have kept me busy, therefore I only tend to post when I have worked on a commission.
During the fall, there was a surge of school fairs. I decided to donate some of my work for their silent auctions. I donated a set of ornaments to one school and a large kusudama (flower ball) to another school.
Both auction items were picked up and I am happy to say that the proceeds have gone to the schools! On top of that, I was commissioned to do a wedding commemorative for the person who won the auction for the kusudama ball.
This commemorative is for a wedding in Prince Edward Island. I truly enjoyed the challenge of encompassing the feel of a place so special to the couple. Below is the progress of the commemorative. The person who commissioned me is a lovely person and I am very glad he likes the work and most importantly appreciates origami. Thanks Don!
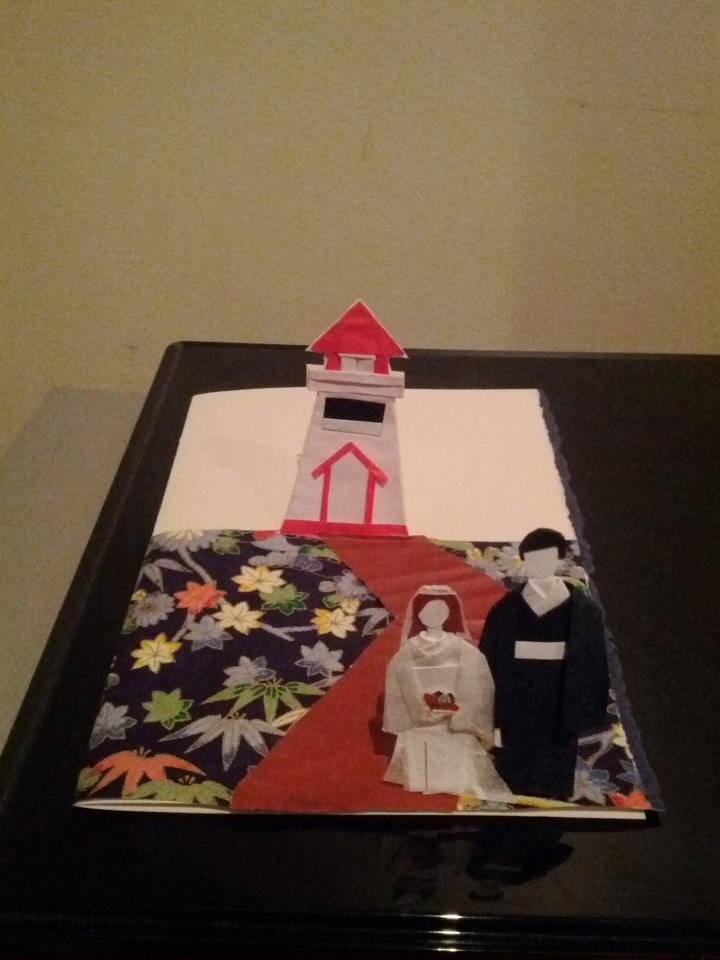
Part I: The Lighthouse
materials: origami paper and cardstock
As P.E.I. plays an important role in the couple's history and the location of the wedding, I wanted to incorporate that into the work. Don was very helpful in giving me information that assisted me in the direction of the piece. I found a picture of a lighthouse in P.E.I. and based the work on it.
I constructed a wooden pathway using a fan fold on an angular bridge shape I had cut out. The background was one of the harder parts. I tried for an hour to make grass, but nothing really suited. I ended up using this beautiful chiyogami pattern which resembled water and pretty flowers. It doesn't exactly give a P.E.I. feel, but it does add an extra decorated effect to the scene.
The origami lighthouse is based on the template for a lighthouse bookmark, with my own revisions. The construction lighthouse was the initial step before adding the couple.
Part II: The Bride & Groom
materials: origami paper, cardstock, chiyogami paper, washi paper and construction paper.
Don liked the direction the piece was going in and felt that the addition of the bride and groom would move the commemorative from a general representation of P.E.I. to one that linked the couple to P.E.I. I totally agreed with this and began working on the couple.
After a viewing a photo of the bride and groom-to-be, I was able to fashion the origami people to resemble them. Fortunately, Don accepted my stipulation that any people represented in the piece would be wearing some sort of kimono and reflect my style of art. I used a combination of paper materials to create the people. The wedding gown was mostly made out of a type of white textured washi paper with very thin gold ribbon embedded throughout it. The bouquet was made out of a piece of red-based chiyogami paper I had used a cherry-blossom punch on. I cut out the petals and overlapped them. I also cherry-blossom punched a piece of decorated white paper for the middle of the flower. I wrapped the bouquet in the same material as the dress.
Part III: Pop-up
method: using an art knife (similar to an exacto knife) I carved out the lighthouse
This step was actually done before the bride and groom were constructed. As soon as the lighthouse was finished I decided on the position and glued it on the face of the card. After it dried, I carved the outline of the lighthouse. That way the card cut be laid flat and the lighthouse could be erected to stand or pushed into the face of the card for storage.
The bride and groom's pop-up feature differ from the lighthouse. Because I used chiyogami for the water and regular origami paper for the wooden pathway, it would be difficult to carve out the miniature features without destroying the base paper. I used a cardstock strip for each character in the form of a tab and glued it to the face of the card. The bride and groom can lay flat on the card or stand on their own (with/without) the lighthouse. Luckily the figures are primarily black and white, so the cardstock strips are the same colour and do not obviously stand out.
Part IV: Storage
Doing a card like this requires careful handling. I placed a cardboard of the same measurement to lay flat on the card, so that the pop-up features are maintained and do not get caught on the lip of the envelope. I also recommended to keep it this way when presenting it to the couple. When they open the envelope they will see a piece of cardboard and behind it the origami work.
When I presented the piece to Don, he was very careful as he opened it. I could tell he valued the work and am very happy that it was well received. I hope to update the blog with the couple's reaction when they receive it later this month.
-SAM-urai