On June 7th, I participated in the Eats & Beats in Riverside Street Festival. The wonderful Riverside BIA approved my idea to make an origami installation. I had thought it would entail me decorating a few poles or trees, but they surprised me by giving me the Target Park fence on Queen/Saulter to decorate.
325 butterflies, 5 hours of folding and 6.5 hours installing nets and origami butterflies and the Networking installation was born. I was given great feedback and enjoyed the process of doing my first official installation!
Thanks to the Riverside BIA for such a wonderful opportunity!
Title: Networking
by Samantha Dizon
This installation portrays various butterflies connected through several nets. Interpretation of the work is left up to the audience.
Having created origami in shadow boxes for several years, Sam felt it was time to bring origami outside to an audience that wouldn't expect to see it on their way to work or while out on a stroll. In doing so, she hopes to convince those who see the butterflies that origami can indeed be art and not just a hobby craft.
Sam Dizon has been folding origami since the age of eight. She teaches origami classes and does commissions. Some of her work has recently been used on HITRECORD on TV season 1 and her origami love (album) has inspired a collaboration on hitrecord.org.
Thursday, June 19, 2014
Sunday, May 25, 2014
2014 Update!
Hello, I have a lot to update! So here's the first one:
On May 31st, 2013, I joined hitRECord - an open, collaborative site/company run by Joseph Gordon-Levitt and his late brother Dan. At first the major pulls for me to join were the idea of looking at the works of talented artists and what JGL's work in all of this was. Soon, getting to know talented people with minds different and alike became incentive to stay and explore more.
Not a long time after I joined it was announced that hitRECord signed on for a television show. I participated with thousands of others contributing work in relation to the themes chosen for each episode. As the episodes aired, I was notified that some of my work had been selected and used in the tv show and that I was credited and would be paid for it. I contributed an image of the number 1 on a red circle and a video of myself folding an origami jumping frog from a US dollar bill, which was later made into a bumper.
On April 3rd, a request was released for an untitled Japanese folk tale collaboration and my work was used as the cover art. Several of my hitrecord friends messaged me that my work was featured in the request. To my surprise, a collaboration had been created inspired by my origami love album and the request featured many of my works. I was floored and extremely appreciative.
Since that time, many people have seen my origami work and have given me feedback.
Here is the request for collaboration featuring my origami work :) Request #1 (Apr 3/14) : http://www.hitrecord.org/collaborations/8948
Request #2 (May 8/14) : http://www.hitrecord.org/records/1606230
Here is a performance of my original Kamishibai story illustrated by Alison Wright http://www.hitrecord.org/records/1542451
Sunday, November 24, 2013
Wednesday, March 27, 2013
EASSU Art Showcase Origami Piece #1
Title: Koi Pond
Description: Koi ponds are common in East Asia and convey a sense of peace. Rather than depict the koi fish and lotus flowers in solid colours, I thought using patterned origami paper would bring something extra to the scene. This is my first shadow box art not featuring origami people.
Materials: chiyogami, origami and washi paper, cardstock, shadow box
Artwork dimensions: 15cm x 15cm
Date: 25/03/13
Wednesday, November 21, 2012
WASHI TAPE ORNAMENTS
Last year I attempted to make washi ornaments and was quite happy with the result. This year, I have expanded my washi tape collection! I recently vacationed in New York City and visited Top Hat on Broome Street. I was able to find wonderful washi tape designs and I also ordered some online. I now have 30 types of washi ornaments to sell!
The great thing about them, is that they are so diverse. They can be used for all sorts of parties - bridal, bachelorette, garden, birthday and of course...Christmas!
Tuesday, October 16, 2012
Bigger Scale Origami
Here are two of my bigger scale origami figures. I would like to do a scene of big characters. Making them takes time and lots of paper - which gets expensive, but in the end, they turn out pretty well.
Sunday, August 12, 2012
Wedding Commemorative Commission
Hello Everyone,
It has been a while! As always, school and work have kept me busy, therefore I only tend to post when I have worked on a commission.
During the fall, there was a surge of school fairs. I decided to donate some of my work for their silent auctions. I donated a set of ornaments to one school and a large kusudama (flower ball) to another school.
Both auction items were picked up and I am happy to say that the proceeds have gone to the schools! On top of that, I was commissioned to do a wedding commemorative for the person who won the auction for the kusudama ball.
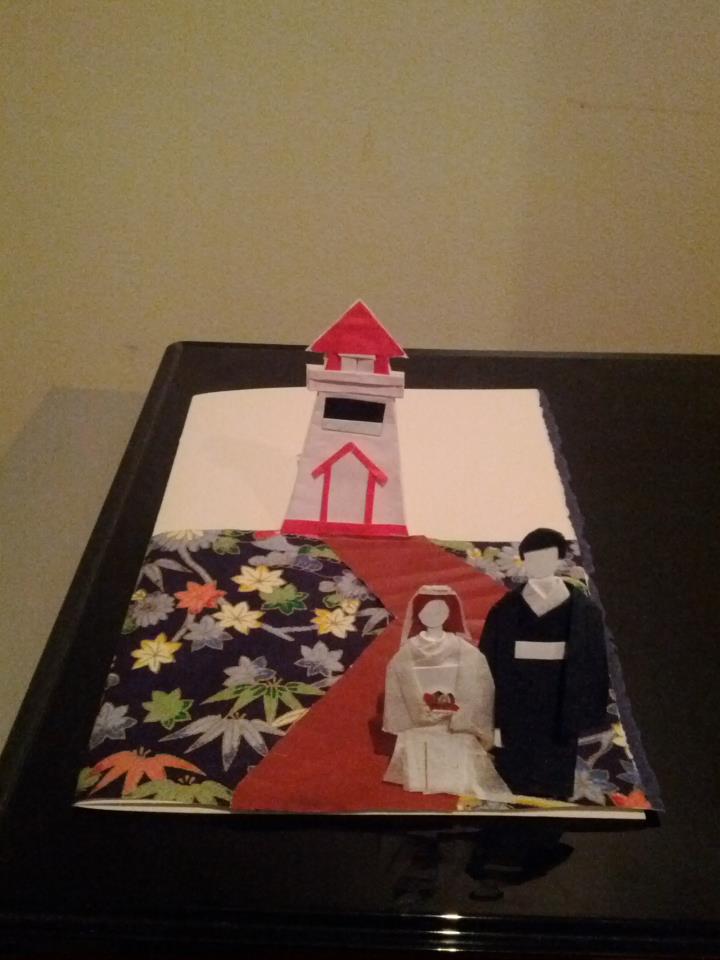
This commemorative is for a wedding in Prince Edward Island. I truly enjoyed the challenge of encompassing the feel of a place so special to the couple. Below is the progress of the commemorative. The person who commissioned me is a lovely person and I am very glad he likes the work and most importantly appreciates origami. Thanks Don!
Part I: The Lighthouse
materials: origami paper and cardstock
As P.E.I. plays an important role in the couple's history and the location of the wedding, I wanted to incorporate that into the work. Don was very helpful in giving me information that assisted me in the direction of the piece. I found a picture of a lighthouse in P.E.I. and based the work on it.
I constructed a wooden pathway using a fan fold on an angular bridge shape I had cut out. The background was one of the harder parts. I tried for an hour to make grass, but nothing really suited. I ended up using this beautiful chiyogami pattern which resembled water and pretty flowers. It doesn't exactly give a P.E.I. feel, but it does add an extra decorated effect to the scene.
The origami lighthouse is based on the template for a lighthouse bookmark, with my own revisions. The construction lighthouse was the initial step before adding the couple.
Part II: The Bride & Groom
materials: origami paper, cardstock, chiyogami paper, washi paper and construction paper.
Don liked the direction the piece was going in and felt that the addition of the bride and groom would move the commemorative from a general representation of P.E.I. to one that linked the couple to P.E.I. I totally agreed with this and began working on the couple.
After a viewing a photo of the bride and groom-to-be, I was able to fashion the origami people to resemble them. Fortunately, Don accepted my stipulation that any people represented in the piece would be wearing some sort of kimono and reflect my style of art. I used a combination of paper materials to create the people. The wedding gown was mostly made out of a type of white textured washi paper with very thin gold ribbon embedded throughout it. The bouquet was made out of a piece of red-based chiyogami paper I had used a cherry-blossom punch on. I cut out the petals and overlapped them. I also cherry-blossom punched a piece of decorated white paper for the middle of the flower. I wrapped the bouquet in the same material as the dress.
Part III: Pop-up
method: using an art knife (similar to an exacto knife) I carved out the lighthouse
This step was actually done before the bride and groom were constructed. As soon as the lighthouse was finished I decided on the position and glued it on the face of the card. After it dried, I carved the outline of the lighthouse. That way the card cut be laid flat and the lighthouse could be erected to stand or pushed into the face of the card for storage.
The bride and groom's pop-up feature differ from the lighthouse. Because I used chiyogami for the water and regular origami paper for the wooden pathway, it would be difficult to carve out the miniature features without destroying the base paper. I used a cardstock strip for each character in the form of a tab and glued it to the face of the card. The bride and groom can lay flat on the card or stand on their own (with/without) the lighthouse. Luckily the figures are primarily black and white, so the cardstock strips are the same colour and do not obviously stand out.
Part IV: Storage
Doing a card like this requires careful handling. I placed a cardboard of the same measurement to lay flat on the card, so that the pop-up features are maintained and do not get caught on the lip of the envelope. I also recommended to keep it this way when presenting it to the couple. When they open the envelope they will see a piece of cardboard and behind it the origami work.
When I presented the piece to Don, he was very careful as he opened it. I could tell he valued the work and am very happy that it was well received. I hope to update the blog with the couple's reaction when they receive it later this month.
-SAM-urai
Subscribe to:
Posts (Atom)